# [周边] Vue Router实现思路
前端路由的本质:监听 URL 的变化,然后匹配路由规则,渲染相应的页面,并且无须刷新。
# 单页面路由的两种实现方式
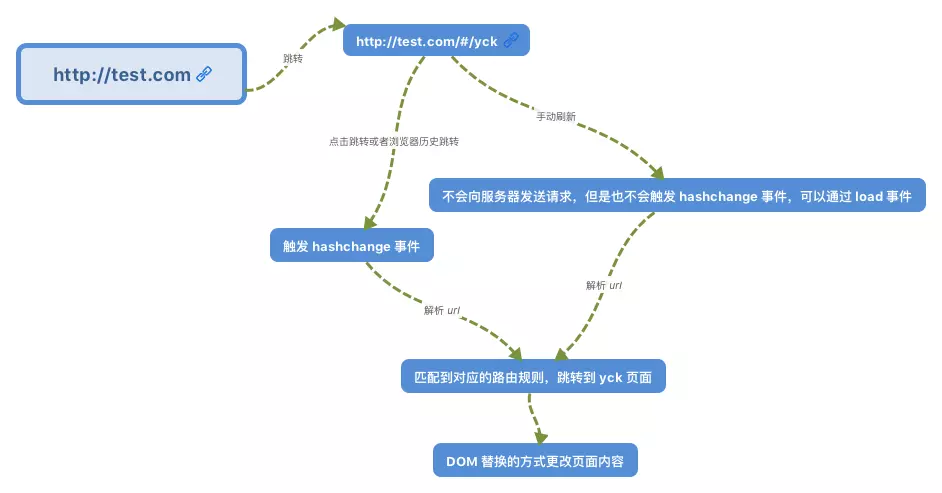
# hash 模式
#后面的哈希值发生变化(不会向服务器请求数据)- 触发
hashchange,解析url - 匹配对应的路由规则
- 跳转页面
手动刷新不会向服务器发送请求,也不会触发hashchange事件,但可以通过load事件解析url
# history 模式
history是HTML5 新推出的功能,比之 Hash URL 更加美观。
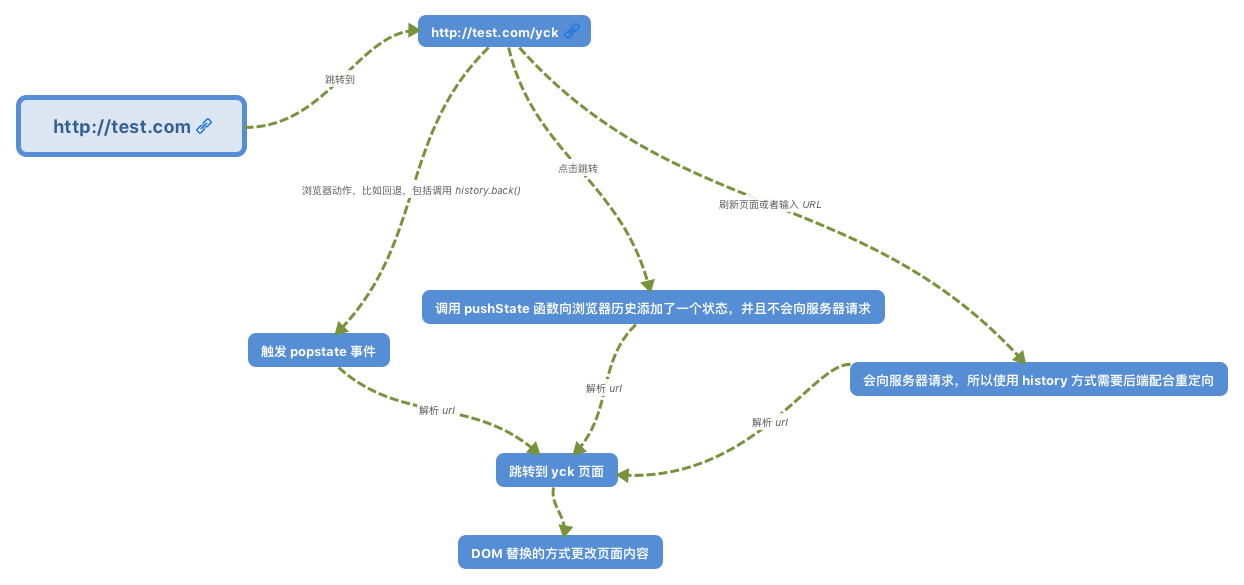
- 跳转时,调用
pushState,创建新的历史记录条目,不会向服务器请求 - 手动刷新,会向服务器重新请求
- 回退(包括
histroy.back()),会触发popState
# VueRouter 的大致步骤
// ① 插件安装
Vue.use(VueRouter)

// ② VueRouter实例化
const router = new VueRouter({
    // ③ 指定路由方式
    mode: 'history',
    // ④ 路由匹配规则,生成路由映射表(该表可通过“构造函数内的路由匹配对象”来访问)
    routes: []
})

router.beforeEach((to, from, next) => {})
2
3
4
5
6
7
8
9
10
11
12
# 插件安装
调用 Vue.use(VueRouter)(让 VueRouter 可以使用 Vue),然后 Vue 会调用 VueRouter 的 install 函数。
在
install函数中,做了两件事:1、给组件混入钩子函数(beforeCreate、destroyed);2、全局注册两个路由组件(RouterView、RouterLink)。
# VueRouter实例化
安装VueRouter插件后,会实例化VueRouter。
VueRouter的构造函数中,会创建一个 路由匹配对象(
this.matcher),并且根据mode采取不同的路由方式:hash、history。
路由匹配对象的作用:有权使用 路由映射表 的几个对象。
# 路由映射表
路由映射表:根据用户配置的路由规则(path、name、children),遍历生成的一份映射表(每条规则,就对应生成一条路由记录)。
路由映射表里的一些个对象:
pathList、pathMap、nameMap。
# 路由初始化(beforeCreate)
路由初始化:当根组件调用 beforeCreate 时,会进行路由跳转、改变URL,然后渲染对应的组件。
# 路由跳转
获取当前路由所匹配的信息。
核心:判断需要跳转的路由是否存在于记录中,然后执行各种导航守卫函数,最后完成 URL 的改变、组件的渲染。
# 导航守卫
导航被触发
在 失活组件 调用离开守卫
调用 全局
beforeEachrouter.beforeEach((to, from, next))1
在 组件内 调用
beforeRouteUpdateconst Foo = { template: `...`, beforeRouteEnter (to, from, next) {...}, beforeRouteUpdate (to, from, next) {...} // ← 调用它 }1
2
3
4
5
在 路由配置里 调用
beforeEnterconst router = new VueRouter({ routes: [ { path: '/foo', component: Foo, beforeEnter: (to, from ,next) => {...} } ] })1
2
3
4
5
6
7
8
9
解析异步组件
在 组件内 调用
beforeRouteEnterconst Foo = { template: `...`, beforeRouteEnter (to, from, next) {...}, // ← 调用它 beforeRouteUpdate (to, from, next) {...} }1
2
3
4
5
调用 全局
beforeResolve导航守卫钩子router.beforeResolve((to, from, next))1
调用 全局
afterEach导航守卫钩子触发组件的渲染