# 组件间通信
# 单向数据流
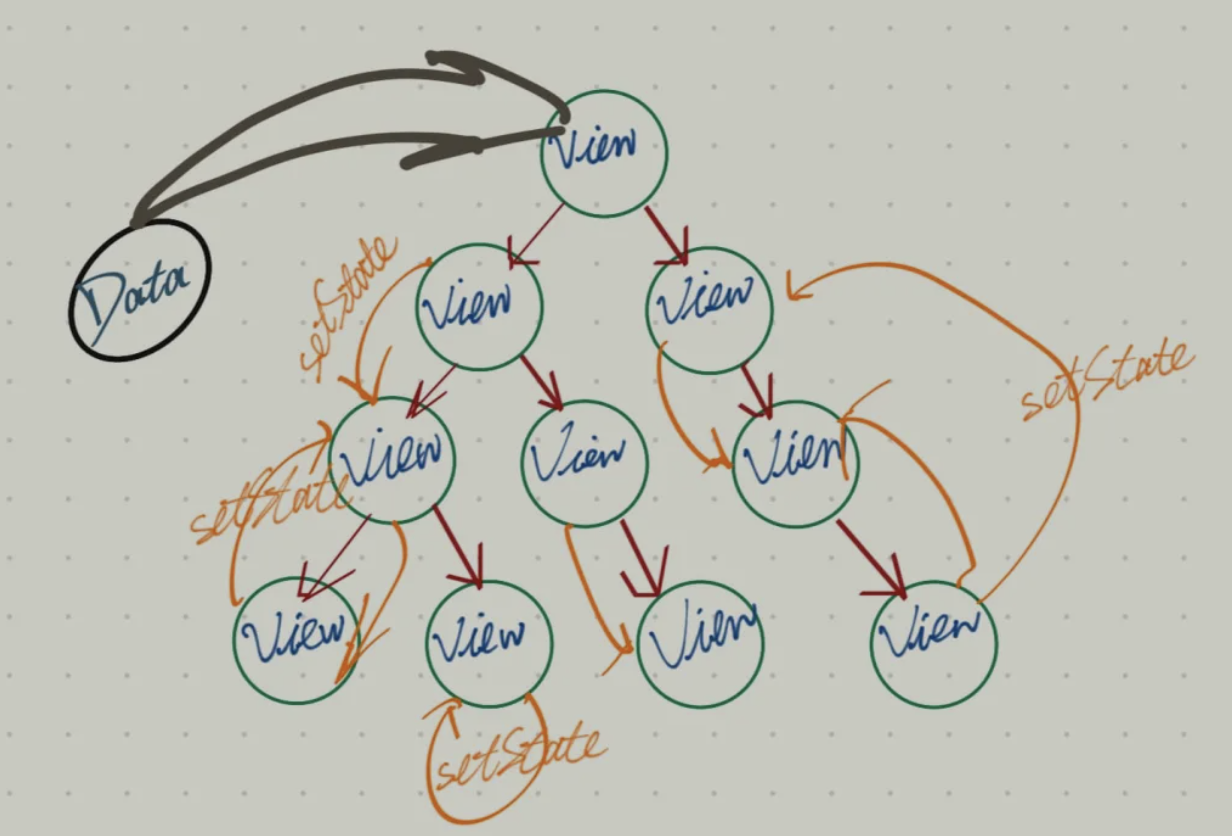
单向数据流:把整个react应用看作一个瀑布,那props就是瀑布水流的额外水源。
<Component data={this.state.data}>
Component组件内部不知道data来源
# React.Context
通过 Context,为 一个组件树(或子组件树) 共享一些“全局”的状态。
# 创建Context对象
const MyContext = React.createContext();
# 定义Context.Provider
<MyContext.Provider value={myValue}>
    /* ... */
</MyContext.Provider>
2
3
Provider 的 value属性 会传递给 Consumer组件。
# 订阅Context
订阅 context 的 3 种方法:
<Context.Consumer>Class.contextType(Class组件)useContext(Hook组件)
// 一、 <Context.Consumer>
<MyContext.Consumer>
    {value => /* */}
</MyContext.Consumer>


// 二、Class.contextType
class MyClass extends React.Component {
  static contextType = MyContext;

  render() {
    let value = this.context;
  }
}

// 三、useContext
function ThemedButton(props) {
    const value = useContext(MyContext); // 把Context对象传入useContext
}
2
3
4
5
6
7
8
9
10
11
12
13
14
15
16
17
18
19
# 关于渲染
当 value 发生变化, Consumer 组件 不会受到中间组件 shouldComponentUpdate 的影响, 依旧会正常触发渲染 。
# 最佳实践
withContext.js:
import React from 'react';

// 1. 创建 Context 对象
const Context = React.createContext({});

// 2. 获取 Provider、Consumer 组件
const { Provider, Consumer } = Context;

// 3. 定义 HOC,使用 Consumer 包裹
const withContext = Component => props => (
    <Consumer>{value => <Component {...props} {...value} />}</Consumer>
);

// 4. 导出 Provider组件 以及 HOC 组件,分别给 顶层组件、消费组件 使用。
export { Provider, withContext };
2
3
4
5
6
7
8
9
10
11
12
13
14
15
app.js(顶层组件):
import { Provider } from '@/components/withContext';

ReactDOM.render(
    <Provider
        value={{
            userInfo,
            currentId,
            setCurrentId
        }}>
        <Index />
    </Provider>,
    document.getElementById('app')
);
2
3
4
5
6
7
8
9
10
11
12
13
my-component.js(消费组件):
import { withContext } from '@/components/withContext';

function MyComponent(props) {} // 经过 HOC,props内可读取到 <Context.Provider> 提供的 value

export default withContext(MyComponent);
2
3
4
5
# react-redux
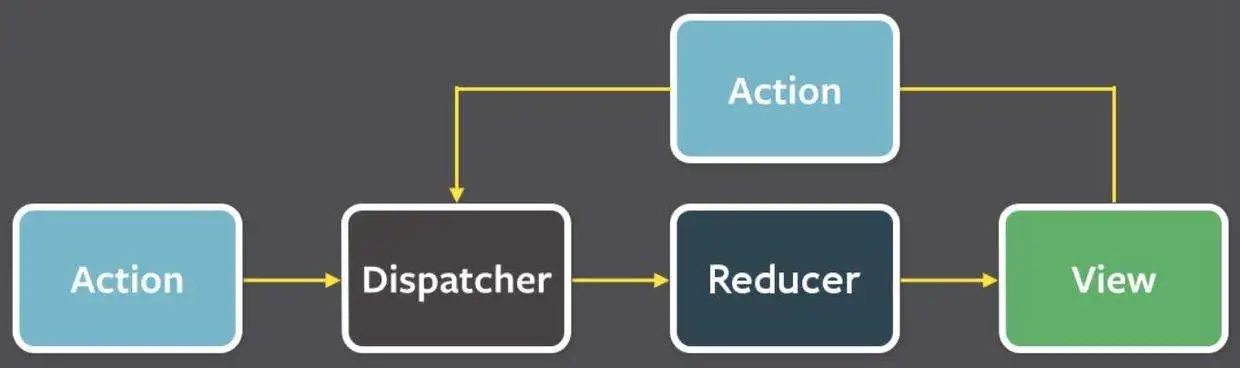
react-redux 是一套 状态管理方案,底层是通过 Redux 实现的。
特点:
- 遵循 单向数据流
- 每一个 state 的变化可预测
- 统一处理校验逻辑
原则:
单一数据源: 整个应用只有唯一的
Store;State只读: 唯一改变
state的方法就是dispatch一个action纯行为函数: 只能通过一个 纯函数
reducer来描述修改。
使用前 vs 使用后:
 vs
vs 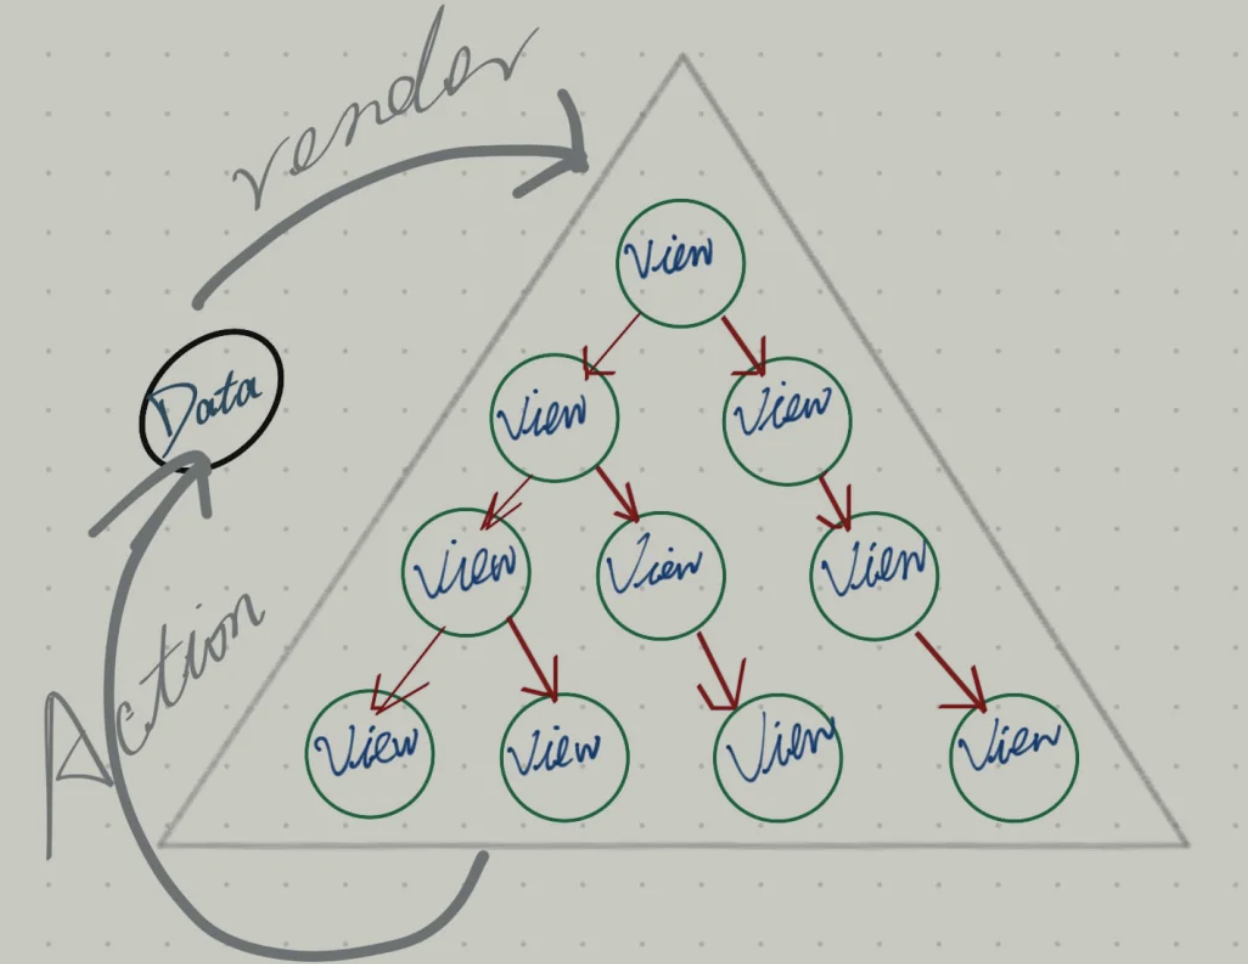
# 基本组成
- store:一个全局唯一的 “状态容器”,存储所有状态(
state)。 - state:状态
- action:
state的变更通知 - dispatch:
View发出 Action 的媒介 - reducer:接收
action、state,返回一个新的state
它们之间的关系:
# 组成
# Provider
<Provider>是一个容器。
原理: 改写 React.Context.Provider。
// 通过 React.createContext 创建一个 context 对象
export const ReactReduxContext = React.createContext(null);

function Provider({ store, context, children }) {
  // ...
  return <ReactReduxContext.Provider value={contextValue}>{children}</ReactReduxContext.Provider>
}
2
3
4
5
6
7
在业务组件内与 connect 配合,可以实现 跨层级数据传递。
# connect
connect 是一个高阶组件,接收 2 个函数:
mapStateToProps:将 “store里的state” 注入到组件的props中mapDispatchToProps:将 “dispatch、action的组合” 注入到组件的props中
// 将 store 里的 color,注入到 当前组件的 props 属性
const mapStateToProps = state => ({
  color: state.color
})
// 将 dispatch + action 的搭配 命名为(changeColor),然后注入到 当前组件的 props 属性
const mapDispatchToProps = (dispatch) => ({
  changeColor: (color) => {
    dispatch(changeColorAction(color));
  }
});
2
3
4
5
6
7
8
9
10
除了上面的作用,还有当 state 发生变化时,通知关联的组件更新。
import {Component} from "react";
import React from "react";
import {PropTypes} from 'prop-types'

// connect是个纯函数,它返回一个组件的类定义
const connect = (mapStateToProps, mapDispatchToProps) => (WrappedComponent) => {
    class Connect extends Component {
        constructor() {
            super()
            this.state = {}
        }

        componentWillMount() {
            this.unSubscribe = this.context.store.subscribe(() => {
                this.setState(mapStateToProps(this.context.store.getState()))
            })
        }

        componentWillUnmount() {
            this.unSubscribe()
        }

        render() {
            return (
                <WrappedComponent
                    {...this.state}
                    {...mapDispatchToProps(this.context.store.dispatch)}
                />
            )
        }
    }

    Connect.contextTypes = {
        store: PropTypes.object
    }

    return Connect
}

export default connect
2
3
4
5
6
7
8
9
10
11
12
13
14
15
16
17
18
19
20
21
22
23
24
25
26
27
28
29
30
31
32
33
34
35
36
37
38
39
40
# 使用示例
import React from "react";
import { connect } from "react-redux";
import { changeColorAction } from "./../../redux/action";

class Header extends React.Component {
  setColor = () => {
    const { changeColor } = this.props;
    changeColor("blue");
  };

  render() {
    const { themeColor } = this.props;

    return (
      <div>
        目前的颜色为:{themeColor}
        <button onClick={this.setColor}>改为蓝色</button>
      </div>
    );
  }
}

const mapStateToProps = (state) => ({
  themeColor: state.themeColor
});
const mapDispatchToProps = (dispatch) => ({
  changeColor: (color) => {
    dispatch(changeColorAction(color));
  }
});

export default connect(mapStateToProps, mapDispatchToProps)(Header);
2
3
4
5
6
7
8
9
10
11
12
13
14
15
16
17
18
19
20
21
22
23
24
25
26
27
28
29
30
31
32
# [实践] react-redux
1、新建reducer.js:接收 action、state,返回新的 state
2、实例化store:向 createStore 传入 reducer
3、引入Provider组件:传入store
4、注入到业务组件:利用 connect 包裹业务组件,将 state、dispatch 注入到组件
react-redux-demo (opens new window)